What Is Shoe Molding? A Complete Beginner Guide for Homeowners
When installing new flooring or updating baseboards, many homeowners notice a small trim piece along the bottom edge of the wall called shoe molding. Although it may seem like a minor design detail, this narrow molding plays an important role in both the appearance and functionality of a room. It helps cover small gaps between the floor and baseboards while giving the space a clean, finished look.
These gaps are not actually mistakes in construction. Most flooring materials—especially hardwood, laminate, and vinyl plank—need a small expansion space around the edges of the room so the material can expand and contract with changes in temperature and humidity. Without something to cover this space, the edges of the flooring may look unfinished or uneven.
This guide explains everything homeowners need to know about shoe molding, including what it is, why it’s used, how it compares to other trim types, and how it can be installed correctly.
What Is Shoe Molding?
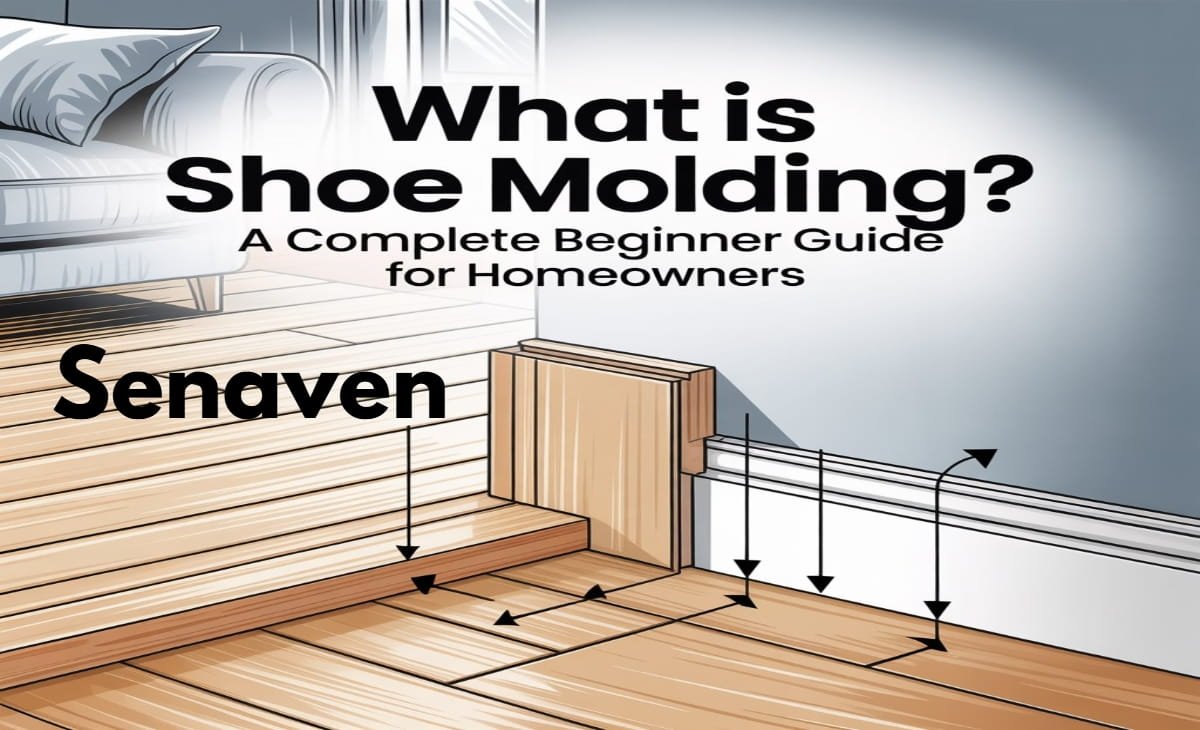
It is a thin piece of trim installed where the baseboard meets the floor. It is designed to cover the small expansion gap left between flooring and walls while maintaining a smooth transition between surfaces. The profile is usually slightly curved or rounded, allowing the molding to sit neatly against both the baseboard and the floor.
Compared to other trim pieces, It is narrow and flexible. This flexibility allows it to follow the slight irregularities that are common in most floors. Because no floor is perfectly level, this feature helps hide minor dips or uneven areas that might otherwise be visible. As a result, the room appears more polished and professionally finished.
Why Homes Need Shoe Molding
It serves both a practical and aesthetic purpose in residential construction. One of its primary functions is covering the expansion gap left around flooring installations. Without this gap, floors may buckle or warp as they respond to seasonal humidity changes. The molding hides this necessary space while still allowing the flooring to move naturally.
In addition to its functional role, shoe molding improves the overall look of the room. It creates a clean transition between the floor and baseboard, which helps the trim appear more complete and intentional. Many homeowners also appreciate the small amount of protection it provides to baseboards, since it can absorb light bumps from vacuum cleaners, mops, or everyday foot traffic.
Another advantage is that shoe molding allows new flooring to be installed without removing the baseboards. Instead of taking off the existing trim—which can damage walls or paint—installers simply add It, afterward to conceal the expansion gap.
Shoe Molding vs Quarter Round
Although shoe molding is often confused with quarter round, the two trims have slightly different shapes and purposes. Quarter round is exactly what its name suggests: a perfect quarter-circle shape. It, on the other hand, is slightly taller and narrower, which makes it more flexible and visually subtle.
Because shoe molding bends more easily, it follows uneven floors better than quarter round. This is one reason many flooring professionals prefer it for finishing the edges of hardwood or laminate floors. Quarter round is still used in some situations, particularly around cabinets, stair edges, or decorative trim details where a more rounded appearance is desired. However, for most baseboard installations, It tends to blend more naturally with the existing trim.
Where Shoe Molding Is Commonly Used
It is commonly installed anywhere flooring meets baseboards. It is especially common in rooms with hardwood floors, laminate flooring, or luxury vinyl plank because these materials require expansion gaps around the perimeter of the room.
In addition to living rooms and bedrooms, shoe molding may also appear in kitchens along the bottom of cabinets or near islands where flooring edges need to be concealed. It is sometimes used on stair landings or transitions between different types of flooring as well. Because the molding is relatively small and unobtrusive, it fits well in both traditional and modern interior designs.
Types of Shoe Molding Materials
Different materials are used to manufacture It, and each option offers specific advantages depending on the environment where it will be installed. Solid wood is one of the most traditional choices and is often selected for homes with hardwood floors because it can be stained to match the flooring. It is durable and visually appealing, but it may be slightly more expensive than other options.
MDF, or medium density fiberboard, is another common material. It is typically used when the molding will be painted rather than stained. MDF provides a smooth surface and is usually more affordable, although it may not perform well in high-moisture environments.
PVC or vinyl shoe molding is increasingly popular for areas where moisture is a concern, such as bathrooms, laundry rooms, or basements. This type of molding is waterproof and flexible, making it a practical choice in spaces where wood trim might warp or swell. When selecting nails or decorative fasteners for shoe molding, it’s important to consider options carefully, much like choosing the right metal finish for your home to match your overall interior style.
How to Install Shoe Molding
Installing shoe molding is a relatively simple project for homeowners who have basic carpentry tools and some patience. The process starts by measuring the perimeter of the room to determine how much molding will be required. It is generally recommended to purchase slightly more material than necessary to account for cutting mistakes or waste.
Once measurements are complete, the molding pieces are cut using a miter saw so that corners fit together cleanly. Inside and outside corners typically require 45-degree cuts, although the exact angle may vary depending on the room layout. Before attaching each piece permanently, it is helpful to test the fit to ensure the joints align properly.
When the molding is ready to install, it should be positioned against both the baseboard and the floor. The trim is then secured with finish nails that go into the baseboard rather than the floor. This detail is important because flooring must remain free to expand and contract. After all the molding is attached, nail holes can be filled with wood filler, and any small gaps along the top edge can be sealed with caulk before painting or staining.
Common Mistakes to Avoid
Many DIY installers run into problems because of a few common trim-installation mistakes. Nailing the molding directly into the floor is one of the most frequent errors, and it can restrict the natural movement of the flooring. Over time, this restriction may cause the floor to warp or buckle.
Another common issue occurs when corners are cut inaccurately. Even small errors in angles can create visible gaps where pieces meet. Taking time to measure carefully and test each joint before nailing the trim in place helps prevent this problem. Some homeowners also skip pre-painting the molding, which can make the finishing process more difficult once the trim is already attached to the wall. Many DIY installers make common DIY installation errors such as nailing directly into the floor or misaligning corners, which can affect the final appearance of the molding.
Cost of Shoe Molding
The overall cost of shoe molding depends on the material used and whether installation is done professionally or as a DIY project. On average, the trim itself is relatively inexpensive compared to other finishing materials used in home improvement projects.
Typical material prices include:
- MDF shoe molding: around $0.50–$1 per linear foot
- Pine wood molding: about $1–$2 per linear foot
- Hardwood molding: roughly $2–$5 per linear foot
- PVC molding: approximately $1–$3 per linear foot
Professional installation may add additional labor costs, often ranging from $4 to $8 per linear foot depending on the complexity of the job and the location of the project.
Pro Tips Most Homeowners Don’t Know
Experienced installers often rely on a few practical techniques that can make it installation easier and produce better results.
Helpful professional tips include:
- Painting or staining the molding before installation to reduce touch-ups
- Using flexible PVC trim in older homes with uneven floors
- Starting installation on the most visible wall to ensure the cleanest cuts appear where they matter most
- Labeling each cut piece during large projects so the pieces are easier to organize during installation
These small strategies can make a significant difference in how clean and professional the finished trim looks.
Alternatives to Shoe Molding
While shoe molding is widely used, some homeowners choose alternative finishing methods depending on their interior design preferences. One option is installing taller baseboards that can cover the expansion gap without the need for additional trim. This approach is common in modern homes where designers prefer a simpler wall-to-floor transition.
Another option is quarter round molding, which provides a similar function but has a rounder shape that is slightly more noticeable. Some contemporary flooring systems also include flexible edge trims designed to hide expansion gaps while maintaining a minimalist look.
Expert Advice for Best Results
For the most professional results, it is important to follow a few best practices when working with trim. Always leave the recommended expansion gap around flooring materials before installing shoe molding, since this space is essential for preventing long-term floor damage. Selecting the right material for the environment is also important; moisture-resistant options such as PVC are ideal for bathrooms and basements.
Using proper finishing nails and carefully filling nail holes will create a cleaner final appearance. Homeowners who want additional guidance on flooring installations can consult resources from organizations such as the National Wood Flooring Association, which provides industry standards for proper floor installation and trim details.
Frequently Asked Questions
Is shoe molding necessary?
Not always, but it helps cover flooring gaps and gives a cleaner finish.
Should shoe molding match the floor or baseboards?
It usually matches the baseboards for a consistent look.
Can shoe molding be installed without removing baseboards?
Yes, it is typically installed after flooring without removing baseboards.
Do modern homes still use shoe molding?
Yes, it is still common in many modern flooring installations.
Can shoe molding work on uneven floors?
Yes, its flexibility helps cover small floor irregularities.
Is shoe molding easy to install yourself?
Yes, many DIY homeowners can install it with basic tools.
Conclusion
It may seem like a small design feature, but it plays an important role in finishing a room properly. By covering expansion gaps, hiding uneven edges, and protecting baseboards, it helps flooring installations look cleaner and more professional. The trim is affordable, relatively easy to install, and available in several materials suited for different environments.
For homeowners planning a renovation or flooring upgrade, understanding how shoe molding works can make it easier to achieve a polished final result that improves both the appearance and durability of the space.